Image Map
Showing posts with label organization. Show all posts

12/8/14

December Monday Made-It

Oh my goodness, December is already here and I only have 2 weeks left until my Winter Break. Now how exciting is that? I realized that it has been a while since I linked up with 4th Grade Frolics for some Monday Made-it. I definitely would like to share with all my wonderful bloggy friends what I have been up to this month. So . . . here I go!


Acrylic Sub Tub

My good friend's birthday is coming up and I decided to hand make her a gift this year instead of buying something she might not need or like. Recently I have been obsessed with acrylic items; from my acrylic bed tray to my acrylic EC recipe box. So, when my friend Aris from Sailing into Second, introduced me to an acrylic file organizer from Target turned into a sub tub I just had to get myself one. 
Below is a picture of the one I made for myself:
(Yes, I was too lazy to take my tub out of my shelf. Don't judge!)

Here is the one I made my friend:
(I feel like the one I made her came out WAY better than mine. LOL)

Aaaaannnddd . . . here is what I mean by obsessed with acrylic:

(I even had to get myself an acrylic pencil holder, which is really a straw holder)


Nautical Whales Book Hospital & Box Top Bucket

This past summer, I remember going to Learning in Wonderland's  blog and telling myself that I needed to make myself a nautical book hospital and box top bucket like she did for her owl themed classroom. However, that project got put on hold since I was teaching a 2/3 combo class for the first 2 months of this school year. BUT now that I am a regular 3rd grade class teacher again, I have time during weekends and breaks to actually craft like I like to! I was finally able to create my projects using my Cricut Explore:

(I'm SO happy with how my project turned out! You can't tell from this pic, but the whale to the left is also holding a box top sticker)

Winter Classroom Projects

Pinterest has seriously been my best friend this past year. I saw this awesome D.I.Y for kids using mason jars as snow globes and decided to try it to test out the level of difficulty. It actually is a very easy project, especially if you have parent helpers helping in the classroom. I will be having my kiddos bring in an empty and unlabeled glass jar to school next week along with a picture of themselves. I also used my Cricut Explore to make labels that say, "There SNOW Place Like Home". Just search for "mason jar snow globes" on Pinterest and you will find all the directions and list of materials needed!
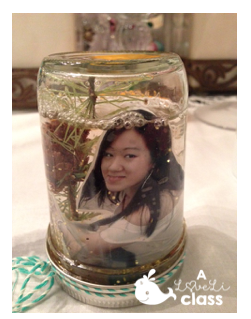
(Believe it or not I don't print out pictures and this old picture of me feeding a deer at the SD Wild Animal Safari Zoo was the only picture I could find of myself)

 Elf on a Shelf Delivery
Tomorrow, Santa will be delivering my Elf on a Shelf book along with a letter to my class. My sister made this awesome bow and I am using Jaimie Knudson from Kinder World Way Elf on a Shelf resources and note tags this year. I can't wait for my class to meet their elf!


 Stampin' Up

Isn't my sister so crafty? She held a stamp class for my teacher friends this past Sunday. These are the cards we all made! My favorite one is the car with the Christmas tree and the snow angel. I just hung mine up on my mini tree.


 O.C.D Tendencies

Lately I have been getting WAY too many clip art (I mean can you blame me? They're just SO cute!) and I was starting to lose track of what I had already purchased or not. So . . . my crazy, anal, needs to be organized or my life is chaotic self; was inspired by Schroeder Shenanigans in 2nd's "Organize Your TpT Cover" to organize ALL MY CLIP ART COLLECTION! 

This is what my file cover and 2 out of 10 pages of my clip art file looks like:
(Don't you just love the Aztec background paper? I'm also obsessed with collecting digital background paper if you can't tell)

As you can see, when I need a file I can just open my document open on my laptop and see if I have the clip art already or not. I am still working on adding the actual title of each clip art above each picture. My summer plan is to have all my digital files that I purchased on TpT also organized by subject. Life is just easier when it is organized, that is all I can say! 

Whew . . . what a long post! 


11/15/14

You Oughta Know About: Minimizing Interruptions from Students During Small Group Instructional Time

Ahoy, my fellow blogging friends! I am SO excited again to link up with Jasmine McClain from Buzzing with Mrs. McClain for this month's You Ougta Know About . . .

Photobucket

This month, I wanted to share with you some awesome management tips I learned during my Project G.L.A.D training about 4 years ago on: "How to Stop Students from Interrupting you When You are Pulling a Small Group or Providing One-on-One Instruction." Since then, I have been using it every time I am teaching small group or one-on-one instruction with a group of students & it has been a TOTAL LIFESAVER!


Above is a picture of my kidney table where I meet students for small group instruction. Notice how I have some student numbered cards and a sign on the left side of the table.


Some Materials You Will Need:
  • a chart stand (I blogged about how I made this on this post)
  • a sign with all your small group instruction rules
  • cards with each student's numbers 
Step 1:
You will need a stand to hold up your sign. I am using one that I made out of PVC pipes. I hang all sorts of mini anchor charts in this chart holder, but I always have my small group instruction rules sign when I am working with a group of students or providing one-on-one instruction.


Step 2:
Create your sign and your rules. I was told that too many rules confuse kids. So the most you would want is a total of 3 rules. Here is what the sign I made looks like:
I made sure that the first rule I had was that students HAD to re-read the questions or the directions of their independent work. A lot of times, I have found from experience, that students ask me questions because they don't read the directions on each page or the questions correctly. 

Next, if that still didn't help them, then they need to ask 3 students before they ask me. I always assign a "captain" (usually a challenge student that can handle independent work in all subject areas) for each table that is in charge of their classmates. They are also allowed to ask captains from other tables in case their own table captain is not sure how to answer their classmate's question themselves.

 Step 3:
FINALLY . . . if students still need additional help, then they bring me their number cards.


Students place the cards by the small group rules sign from left to right so that I know which student came for help first. (I got mine from Hope King from Second Grade Shenanigan's "Gone Coastal" classroom decor).

My students wait for me to call on their number to see me. When my small group works on something, I take that opportunity and window of time to call on students that have additional questions. Most of the time students figure out the answers after thinking for a longer time and often just want me to see if they did do their problems correctly. 

Step 4:
 Model, model, model!!! During the first few days of school, my students are constantly modeling and practicing the classroom rules and routines with me. They ALL participate so that the routine and rule has been instilled in their brains. And IF for any reason, my students interrupt me because they have forgotten our classroom rules, then I simply point to the sign without saying a word while I am still providing small group or one-on-one instruction.

 Of course, students also know that if there is a case of emergency, then they can interrupt me. We have made charts earlier in the year discussing what would be considered an emergency that needs immediate attention from their teacher & what it would possibly look like.

I hope you will find this strategy helpful & as useful as it has been for me! 


10/12/14

Organizing Technology in Your Classroom

Ahoy there, bloggers! Have you recently had the AWESOME privilege of having your own class set of laptop carts in your classroom? My district had some extra funding this past school year and each classroom in grades 2-5 will be getting their own laptop cart and 26 laptops (for grades 2-3) and 35 laptops (for grades 4-5). 

Now . . . anyone that knows me well, knows I LOVE technology. So much so, I miss my SmartBoard. Booo... (that's another story).

Oh well, life goes on (I suppose).

Like many teachers in my school, I was excited to get rid of the old desktops that took up too much classroom space. I decided to not keep any of my desktops and only keep my laptops. I knew that as a teacher, it would be a lot of work to get the routine for myself and for my students going in terms of how to properly treat their laptops. But, after 3 weeks of consistently implementing it every single day, things are running smoother and much better.

The first thing I recommend if you happen to have a cart (then you will definitely KNOW what I am talking about) is to get some organization with the charging cords and ethernet cords itself.

What You Will Need:

  1. label machine
  2. twisty cord ties
  3. labels for the labeling machine


This is what my cart looks like from afar when it is open:
(Can I say how awesome it was that I was given purple bins to store all the mouse and headphones)?!?

I not only used a labeling machine to number the mouse and headphones, but I have one going around the proper cord and ethernet cord. Upon sticking the labels, I felt the need to secure them better with a twisty tie (I believe I got mine from Daiso, a Japanese dollar store).

Now a close up view of the inside of my laptop cart:

Each slot was properly numbered by the technicians in the District Office before being delivered to each classroom. However, after using it for a day, I realized that the cord situation was a HOT MESS!  They tangle once everything is unplugged, making it super difficult to figure out which cord went where. On top of that, if you messed up on the cords; then boy oh boy you would have to unplug everything and start again because the cords only reach a certain amount of length. Frustrating to say the least! 

What does this crazy, needs everything organized lady do? I stayed after school one day for an extra hour to get all of these cords organized is what I did! First, I made sure that I had all of the cords paired up with the right cords. Next, I used the labeling machine to number the cords so I knew which laptop and slot went with which cords. Finally, I used twisty cord ties that I had and bonded everything together. It sure was a plus that the twisty cord ties came in my exact classroom colors (totally unplanned too, I had these twisty cord ties forever and never put them into use). Life is great I tell ya!!! No more messy cords either!

Laptop Pass Out Daily Routine:

  1. First thing I do when I come in the morning is unplug the charging cord and the ethernet cable. 
  2. I hired (Yes, hired because my students have to persuade me in their job application to why they deserve a classroom job) 2 technology crew members. Every morning after our morning calendar and daily routine, they help pass out the headphones and mouse. Before we pack up and go home, they put away all the headphones and mouse.
  3. They also come and help me pass out the laptop and put them away at the end of the day.
  4. A bonus job, is that they also get to help any classmate that still does not know how to properly shut down a computer. 
  5. I always count the laptops before any child is allowed to get their backpacks or leave the classroom. 
  6. Being the super anal person that I am, I also am the one that plugs and unplugs the chargers and ethernet cable cords because if that thing breaks...there goes my classroom technology time.
How I use the Laptops in my Classroom:


  1. May Do time for our school wide typing - "Typing Agent"
  2. Assessments - my District purchased the ability to have students take their core curriculum assessments online, as well as district benchmark tests online. 
  3. Inquiries and research projects
  4. Class forums and discussions - Last year I purchased my own domain name and built my own classroom website thru Weebly. Weebly has a feature where I can post forum discussions, surveys, and quick charts for students to vote and answer questions on.
  5. Accelerated Reader & Accelerated Math
  6. Virtual Re-reads - My district also purchased virtual features that allow the students to watch grammar snapshot videos, re-read their selection story for the week, or take performance tasks online.
  7. Virtual Math Manipulatives-Singapore math gives virtual manipulative access to students online for their math
  8. Writing - students now can publish their own writing piece using MS Word. 
  9. Powerpoint presentations for Science & Social Studies
Of course, with anything classroom related, you have to teach, model, and train your students with what you want them to learn. It will be challenging in the beginning, but they pick up these things fast!
There is SO much you can do with them. I am a little sad though that I can't sign my students up for their own e-mails (due to internet safety issues). I wish my district would purchase the kiddos a safe email addy for all of them so that I wouldn't have to go around with my USB drive saving their work or e-mailing them to myself when I forget my USB drive at home. I have 2 friends at different school districts that said their district actually provided the students with their own Google accounts. Sounds SO awesome! Seriously, the only CON I have experienced is the ethernet cables being so new and dang tight. I had to pinch it with my nails to get them out. They are starting to get more loose, so my nails are happy.